QuickVis
QuickVis provides instant access to common visibility operations in Revit through an intuitive radial menu. Instead of navigating complex Visibility/Graphics dialogs for everyday tasks, switch between minimal, presentation, documentation, and coordination modes with a single click. Save and restore per-view visibility snapshots as custom defaults.
Getting Started
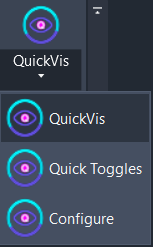
Section titled “Getting Started”Find QuickVis on the Amorphous ribbon tab in the View Tools panel. Click the main button to open the radial menu.
Features
Section titled “Features”- Radial menu interface - Centered, draggable radial menu with four preset mode quadrants
- Minimal mode - One-click clean view that hides all annotations, model lines, CAD imports, and links, and sets a prefedined detail level and visual style.
- Customizable presets - Three user-configurable modes (Presentation, Documentation, Coordination)
- Per-view snapshots - Save the current visibility state as a default and restore it anytime
- Instant application - Changes apply immediately when you click a preset
The Radial Menu
Section titled “The Radial Menu”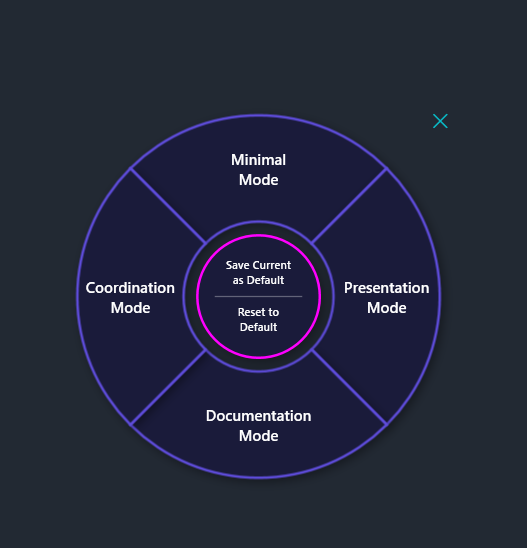
The radial menu appears centered on screen with four preset quadrants and a central snapshot hub.
| Quadrant | Mode | Default Behavior |
|---|---|---|
| Top | Minimal | Hides all annotations, model lines, CAD imports, links. Sets Fine detail and Shaded display. |
| Right | Presentation | Hides most annotations for clean views. Customizable. |
| Bottom | Documentation | Shows all annotations for CD production. Customizable. |
| Left | Coordination | Shows links and point clouds, hides annotations. Customizable. |
How to Use
Section titled “How to Use”Applying a Preset Mode
Section titled “Applying a Preset Mode”- Click QuickVis on the ribbon to open the radial menu
- Hover over a preset to highlight it
- Click the preset to apply it immediately
- The view updates and the menu closes automatically
Press ESC or click the X button to close without making changes.
Understanding Each Mode
Section titled “Understanding Each Mode”Minimal Mode
Section titled “Minimal Mode”Minimal Mode provides a one-click clean view for presentations and screenshots:
- Hides all annotation categories (except Section Box)
- Hides model lines, CAD imports, point clouds, and Revit links
- Sets detail level to Fine
- Sets visual style to Shaded
Presentation Mode
Section titled “Presentation Mode”Default configuration hides most annotations while keeping essential references visible. Ideal for client presentations, renderings, and screenshots.
Documentation Mode
Section titled “Documentation Mode”Default configuration shows all annotations for construction document production. Use when switching from design mode to documentation.
Coordination Mode
Section titled “Coordination Mode”Shows Revit links and point clouds while hiding annotations. Perfect for reviewing linked models and coordination meetings.
Saving and Restoring View Defaults
Section titled “Saving and Restoring View Defaults”The center of the radial menu provides snapshot management for per-view visibility defaults.
Saving a Snapshot
Section titled “Saving a Snapshot”- Configure your view visibility exactly as you want it using V/G overrides
- Open the radial menu by clicking QuickVis
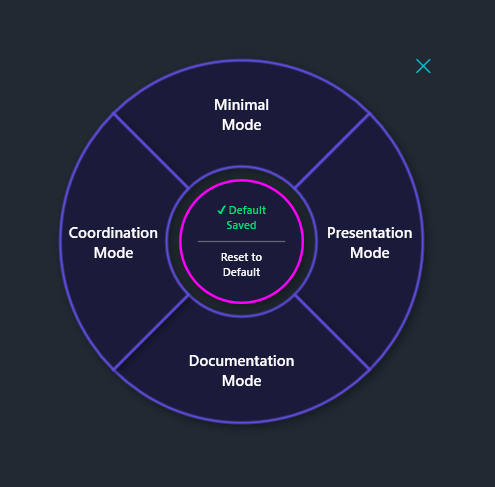
- Click “Save Current as Default” (top half of center button)
- A green checkmark appears indicating a snapshot exists for this view
Restoring a Snapshot
Section titled “Restoring a Snapshot”- Open the radial menu in the view with a saved snapshot
- Click “Reset to Default” (bottom half of center button)
- The view’s visibility settings restore to your saved state
Snapshots are saved per-view and persist across Revit sessions. Each project maintains its own set of view snapshots.
How Snapshots Work
Section titled “How Snapshots Work”Snapshots capture:
- Category visibility states (on/off for each category)
- Hidden elements (CAD imports, point clouds, Revit links)
- Detail level and visual style
Snapshots are stored in:
%AppData%\Amorphous\QuickVis\snapshots\{ProjectID}.jsonKeyboard Shortcuts
Section titled “Keyboard Shortcuts”| Key | Action |
|---|---|
ESC | Close radial menu without changes |
Use Cases
Section titled “Use Cases”Quick Screenshot
Section titled “Quick Screenshot”Need a clean view for a presentation slide?
- Open your 3D or plan view
- Click QuickVis → Minimal Mode
- Capture your screenshot
- Click QuickVis → Reset to Default to restore
Switching Between Modes
Section titled “Switching Between Modes”Working on a project that requires frequent mode switching?
- Set up your Documentation Mode with all annotations
- Set up your Coordination Mode with links visible
- Use the radial menu to switch instantly between modes
Custom Default Views
Section titled “Custom Default Views”Want certain views to always open with specific visibility?
- Configure the view exactly how you want it
- Save as default with the radial menu center button
- When the view drifts, one click restores your settings
Limitations
Section titled “Limitations”- View Template restrictions - Categories controlled by view templates cannot be changed by QuickVis. The template must be modified or removed first.
- Minimal Mode is fixed - Cannot be customized; always applies the same settings.
- Element-level hiding - CAD imports, point clouds, and Revit links use element-level hiding, not category visibility.
Troubleshooting
Section titled “Troubleshooting”Preset Doesn’t Change Anything
Section titled “Preset Doesn’t Change Anything”Cause: View template is controlling visibility settings.
Solution: Check if the view has a template applied (Properties palette). Either remove the template or modify it to unlock visibility settings.
Snapshot Not Restoring
Section titled “Snapshot Not Restoring”Cause: No snapshot saved for this specific view.
Solution: The “Reset to Default” only works if you previously saved a snapshot. First configure the view, then use “Save Current as Default”.
Menu Appears Off-Screen
Section titled “Menu Appears Off-Screen”Cause: Menu position was dragged off-screen in a previous session.
Solution: The menu resets to center on each opening. If it’s still off-screen, try maximizing your Revit window.
Command Takes a While to Open
Section titled “Command Takes a While to Open”Cause: On some machines, reading preset data from disk can be slower than expected due to background processes or security software.
Solution: This is usually a one-time delay per session. If it persists, let me know on GitHub with details about your setup so I can look into optimizing it.
Related Tools
Section titled “Related Tools”- Quick Toggles - Dockable panel for individual category toggles
- QuickVis Configure - Customize preset modes and toggle settings
- Toggle Point Clouds - Dedicated point cloud visibility control