Smart Section Box
Smart Section Box creates section boxes that automatically rotate to match the orientation of your selected element(s). Unlike Revit’s default axis-aligned section boxes, Smart Section Box eliminates wasted space by aligning to angled walls, rotated families, and structural framing.
Getting Started
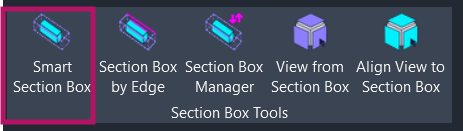
Section titled “Getting Started”Find Smart Section Box on the Amorphous ribbon tab in the Section Box Tools panel.
The button is enabled when:
- Model element(s) are selected (walls, floors, families, etc.)
- Datum element(s) are selected (grids, levels, reference planes)
- Model Group(s) are selected
- A Revit Link instance is selected
- You’re in a 3D view with an active section box (to toggle it off)
- You’re in a plan, section, or elevation view (to create from view extent)
Features
Section titled “Features”- Automatic rotation alignment - Section box rotates to match angled walls, structural framing, and rotated families
- Multi-element selection - Select multiple elements to create one combined section box
- Datum element support - Create section boxes along grids, levels, or reference planes
- Model Group support - Section box aligned to group member geometry
- Linked model support - Create section boxes around an element in linked Revit models
- 2D view support - Create section boxes from plan or section view extents
- Toggle functionality - Quickly disable section boxes with one click
- Padding adjustment panel - Fine-tune the section box after creation
- Session history - Undo/redo through up to 10 section box states per session
- Worksharing safe - Creates user-specific 3D views to avoid conflicts
How to Use
Section titled “How to Use”Basic Workflow
Section titled “Basic Workflow”- Select elements in any view
- Click “Smart Section Box” on the ribbon
- The add-in automatically:
- Switches to (or creates) a user-specific 3D view
- Calculates the optimal rotation from element geometry
- Creates a section box with default padding
- Adjust if needed using the Padding Panel
Off-Axis/ Rotated Element(s)
Section titled “Off-Axis/ Rotated Element(s)”When you select elements that aren’t aligned to the project grid, Smart Section Box detects the primary direction and rotates the section box to match. This includes but not limited to:
- Most Model elements
- Family instances
- Imported CAD geometry
- Special handling of some Annotation families
- Direct Shapes and In-Place families
- Select one or more grid lines
- Click “Smart Section Box”
- A thin section box is created along the grid line(s)
Levels
Section titled “Levels”Selecting levels creates horizontal section boxes between floor elevations.
Single level selected:
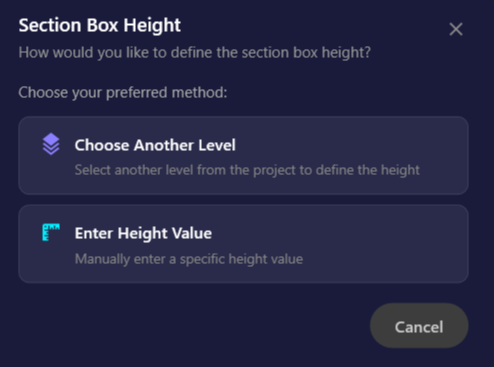
If there are other levels in the project, you’ll be asked how to define the height:
| Option | Description |
|---|---|
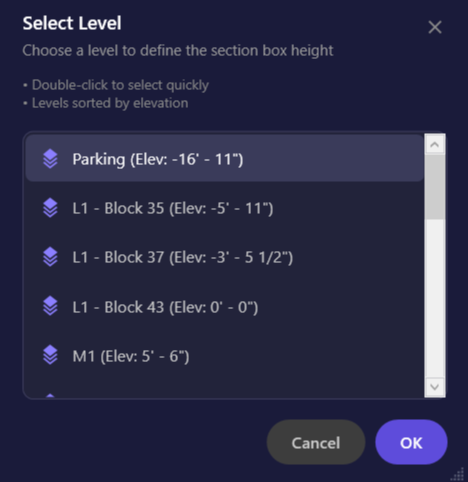
| Choose a Level | Pick another level to define the section box height |
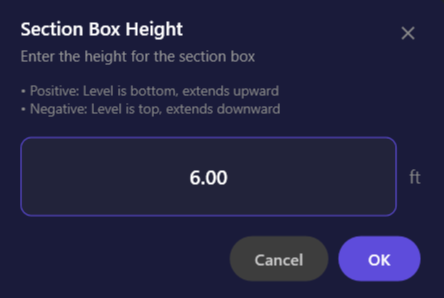
| Enter Height | Type a specific height value |
Multiple levels selected:
The section box automatically spans from the lowest to the highest selected level.
Reference Planes
Section titled “Reference Planes”- Select a reference plane (must be vertical - drawn in plan view)
- Click “Smart Section Box”
- A thin section box is created along the reference plane
Model Groups
Section titled “Model Groups”- Select one or more Model Groups
- Click “Smart Section Box”
- Section box is created around the group members
Mixed selection (groups + other elements):
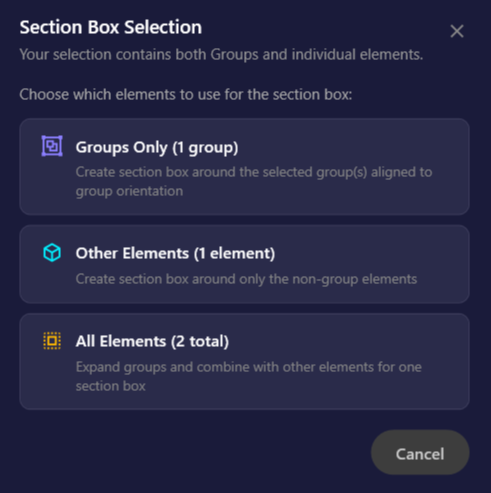
When your selection includes both groups and other elements, you’ll be asked which to include:
| Option | Description |
|---|---|
| Groups Only | Section box around group members only |
| Other Elements | Section box around non-group elements only |
| All Elements | Expand groups and include everything |
Linked Models
Section titled “Linked Models”- Select a Revit Link instance in your model
- Click “Smart Section Box”
- Pick an element inside the linked model when prompted
- Section box is created around the linked element
From 2D Views
Section titled “From 2D Views”Create section boxes that match your current view extent:
- Open a plan, section, or elevation view
- Ensure nothing is selected
- Click “Smart Section Box”
- A 3D section box is created matching the 2D view’s crop region and view range
This is useful for quickly creating 3D views that correspond to your sheet views to visualize their extent.
Toggle Section Box Off
Section titled “Toggle Section Box Off”- Clear your selection (click in empty space)
- In a 3D view with an active section box, click “Smart Section Box”
- The section box is disabled
User Interface
Section titled “User Interface”Padding Panel
Section titled “Padding Panel”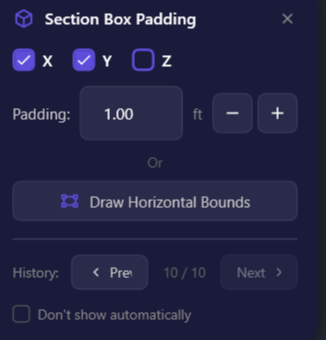
The Padding Panel appears after creating a section box (if enabled in Preferences). It lets you fine-tune the section box size without recreating it.
| Element | Description |
|---|---|
| X, Y, Z checkboxes | Select which axes to adjust. Uncheck axes you want to lock. |
| Padding value | Amount to extend or shrink (in project units) |
- button | Shrink the section box by the padding amount |
+ button | Extend the section box by the padding amount |
| Draw Horizontal Bounds | Pick two points to redefine horizontal extents |
| History (Prev/Next) | Navigate through previous section box states (up to 10) |
| Don’t show automatically | Disable auto-display of this panel |
Keyboard shortcuts:
ESC- Close the panelEnter- Dismiss focus from text field
Tips:
- The panel remembers its position during your session - drag it where convenient
- Padding values are saved between uses
- The panel auto-hides when you toggle the section box off
Draw Horizontal Bounds
Section titled “Draw Horizontal Bounds”This feature lets you redefine the horizontal extents of your section box by drawing a rectangle:
- Click “Draw Horizontal Bounds”
- The panel hides and an instruction bar appears
- Draw a rectangle by clicking two opposite corners
- The section box updates to match your drawn bounds (Z height preserved)
- The panel reappears
History Navigation
Section titled “History Navigation”Every change to the section box is recorded (up to 10 states). Use Prev and Next to step through your adjustments.
The indicator shows your current position (e.g., “3 / 5” means you’re viewing the 3rd of 5 recorded states).
Options & Settings
Section titled “Options & Settings”Preferences
Section titled “Preferences”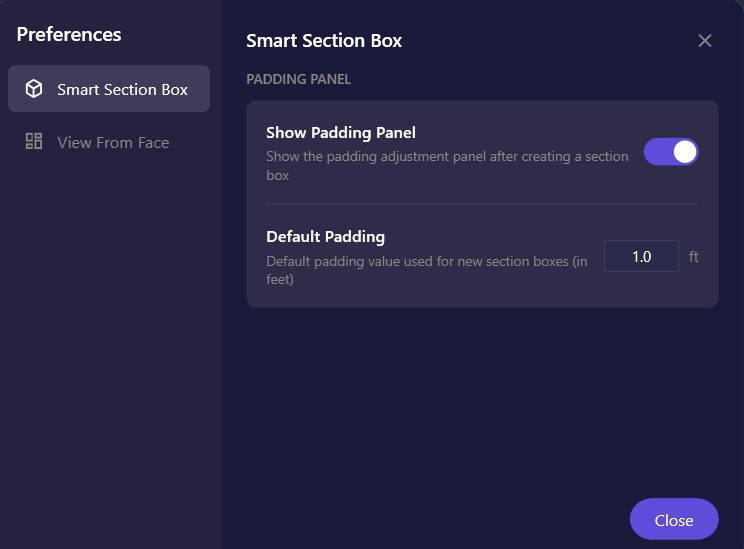
Access preferences via Settings dropdown > Preferences > Smart Section Box.
| Setting | Description | Default |
|---|---|---|
| Show Padding Panel | Display the padding panel after creating a section box | On |
| Default Padding | Initial padding value used for new section boxes | 1.0 ft |
Automatic 3D View
Section titled “Automatic 3D View”If you’re already in a 3D view, Smart Section Box uses that view. Otherwise, it creates or switches to a user-specific 3D view named {username}-SSBox (e.g., jsmith-SSBox). This prevents conflicts in workshared projects where multiple users might run the command simultaneously.
Tips & Best Practices
Section titled “Tips & Best Practices”- Keyboard shortcut: Assign a shortcut to Smart Section Box for faster access (Revit Options > Keyboard Shortcuts)
- Combine with Section Box Manager: Save frequently-used section box states for quick recall
- Rotation source: When multiple elements have different orientations, the first element’s direction is used
- Ambiguous geometry: For elements with multiple sides (like floors), the longest edge determines orientation. If this isn’t the direction you want, use Section Box by Edge to pick a specific edge
- Linked model trick: To box around an entire linked building, just select the link instance without picking an internal element
- Negative heights: When entering level heights, use negative values to extend downward
Limitations
Section titled “Limitations”| Limitation | Details |
|---|---|
| Curved grids | Only straight grid lines are supported |
| Non-vertical reference planes | Reference planes must be drawn in plan view (vertical orientation) |
| Single linked element | Can only select one element at a time from linked models |
| Mixed host/link | Cannot combine host model elements with linked model elements in one selection |
| Draw Bounds accuracy | Works best in plan views or when looking straight down |
Troubleshooting
Section titled “Troubleshooting”Section box appears but isn’t rotated
Section titled “Section box appears but isn’t rotated”The tool analyzes geometry to find the primary direction. If elements have complex or ambiguous geometry, the section box may default to axis-aligned. Try selecting a single, clearly-oriented element (like an angled wall) first.
”Could not create section box from view extent”
Section titled “”Could not create section box from view extent””This occurs when creating from a 2D view that has no crop region defined or an invalid view range. Ensure your view has a crop region enabled with valid bounds.
Padding panel doesn’t appear
Section titled “Padding panel doesn’t appear”Check that Show Padding Panel is enabled in Preferences. Also, the panel won’t appear if you’re toggling a section box off (no selection).
Draw Bounds produces unexpected results
Section titled “Draw Bounds produces unexpected results”Draw Bounds projects your rectangle onto the section box’s coordinate system. For predictable results:
- Use a plan view, or
- Orient your 3D view to look straight down before drawing
Related Tools
Section titled “Related Tools”- Section Box by Edge - Create section boxes aligned to a picked edge
- Section Box Manager - Save, recall, and manage section box states
- View from Section Box - Create 2D views from section box extents
- Align View to Section Box - Orient 3D view to match section box